
Welding isn’t easy; it is a meticulous task that requires a steady hand and precision. While some welding jobs don’t look at the appearance of the weld as much as the hold, many tasks call for seamless joint welds free from defects and discontinuities.
One of the most common complications in welding is an undercut, creating weld defects that are unpleasant to the eye and weaken the joint. An undercut defect must be corrected for you risk ruining the entire project.
The best way to avoid undercuts in welding is by understanding what they are. That is what we will be discussing in this article.
What Is a Welding Undercut?
We’ve already briefly touched on what an undercut weld is in the opening paragraph, but to give you better insight, we want to dig a bit further so you can easily detect them in any material.
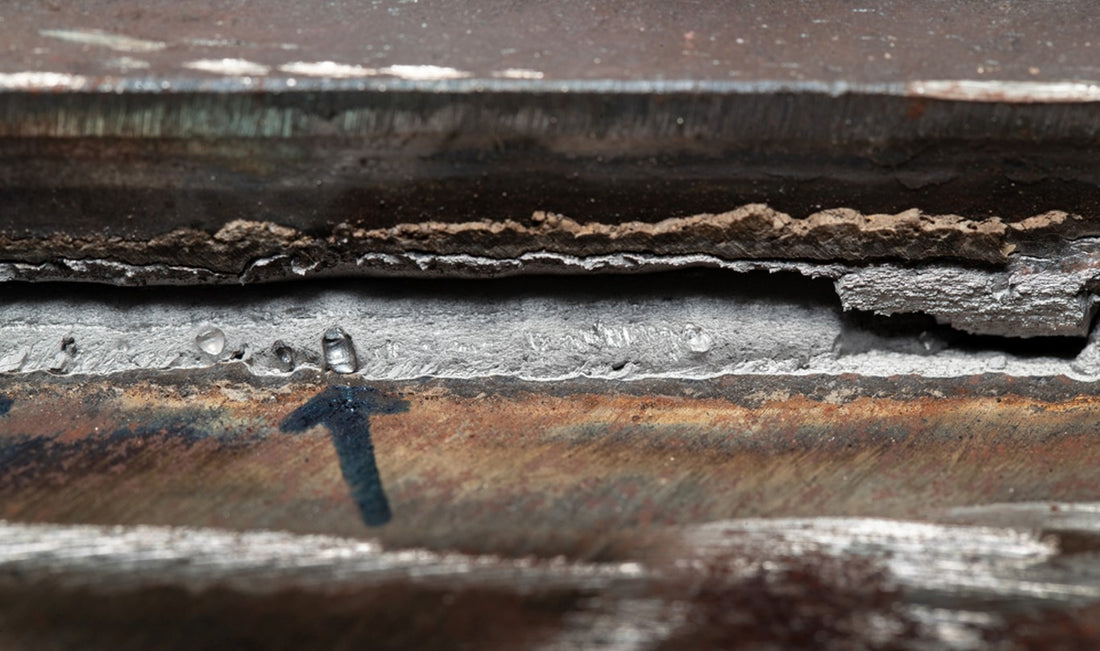
A welding undercut is considered surface damage. These formations occur right next to the weld bead on the base metal. An undercut formation that is large enough is known as a welding defect or discontinuity.
What Causes Undercuts in Welding?

An undercut typically occurs when proper welding procedures are not followed. These are common complications caused by people new to the industry or those rushing the job.
You will see this condition on metal surfaces when the welder accidentally melts the base metal when creating a joint and never fills in with a filler material. The result is a gap or crater-like divot.
An undercut will often form when the filler material is fed too quickly, not giving the welding machine enough time to fill the crater on the base metal with an adequate amount.
Another way undercuts form is when welding creates too much heat, melting the base metal to an accessible amount.
How to Tell If There Is an Undercut in Your Weld
Most of the time, you can simply see an undercut in your weld by inspecting it. Visually, undercuts are sharp-edged, linear grooves in your base metals.
For a fillet weld or groove bead weld, undercutting appears as breaks in base materials at the edge of beads. Notably, in groove beads, this can be an internal undercut and external undercut welding defect.
In the welding industry, professional inspectors can also use white lights to illuminate the base of a weld. This will create a noticeable contrast if an undercut exists.
Lastly, undercuts can be found after painting the weld with white paint. This kind of weld defect is easily spotted with the right lighting, especially when using a professional light (detector).
Can You Fix Undercuts in Welding?

Unlike many other defects or errors in the welding process, you cannot fix an undercut simply by grinding it. Grinding is used to remove access material or smooth surfaces. They must be filled because undercuts are divots or open craters in the weld.
You can easily fix and undercut by patching or molding the hole. Unfortunately, if the undercut is too significant, you might remove the weld and start over.
How to Prevent Welding Undercuts?
The best way to deal with an undercut is to never create them in the first place. There are many ways to prevent undercuts from forming. Check out this video on how to prevent undercuts.
Here is a list to help you avoid creating craters in your next welding job.
- Always let your base metal cool down. Too much heat will melt your base materials.
- Keep control over the weld angle. Maintaining control of the wide angle can aid in a smooth weld joint.
- Choose the best welding posture or position. Maintaining a good position when welding will keep you steady and comfortable.
- Try not to use large-diameter electrodes. Large-diameter electrodes can be hard to control, covering larger areas and emitting heat to wide spaces.
- Reduce your welding current. Reducing your weld current will keep the process moving along at the best settings for a seamless weld.
- Reduce your weave width. Reducing your weave width when welding will reduce the chances of divots forming in the base metals.
- Ensure the electrode is a safe distance away from the vertical plane before you weld horizontal fillets.
- Slow your welding speed. A slow and steady welding speed is the best way to ensure you're getting clean welds and the filler has a chance to make its way into any divots that form on the base metal.
- Steer clear of excessive welding in one sitting. Welding too much for too long can take a toll on the user and the machine, leading to an incorrect welding technique, defects, and damage to the weld.
- Use a uniform rocking motion at the butt weld. Always using a uniform rocking motion ensures the welded joint gets even attention and the right pace.
Aside from the great advice above, the best way to prevent undercuts when welding is by learning how to use your welding machine appropriately.
Those new to the process should always practice multiple times on scrap material before attempting to make a weld on any important job.
What Are the Main Effects of Having Undercuts in Your Weld?
Undercuts are empty pockets inside the base material of your weld. These pockets will weaken your weld and cause issues with the integrity of the joints.
By reducing the strength of the weld joint, undercuts are the ideal location for cracks and damage to form. This can create many problems on any project, especially if the joint is holding heavy weight, which can cause the weld to break apart.
To ensure your weld's durability, strength, and safety, undercuts should be limited or avoided at all costs.
Summing Things Up
Don’t waste time trying to repair or replace a damaged joint due to undercuts in the base material. Instead, use one of the great tips above to avoid these defects before they ruin your project.
The best way to avoid undercuts and ensure the strength and integrity of your bond is to take the time to learn how to use your welder correctly and follow through with the process with patience.