

A foggy lens mid-pass, a slow-reacting auto-darkening filter (ADF) on a root weld, a cracked cover lens nobody replaced last Tuesday — these aren’t minor inconveniences, they’re the kinds of oversights that stall production, compromise weld quality, and put workers at serious risk. Your welding helmet is the single most used piece of personal protective equipment in a fabrication shop, yet it’s often the last thing anyone cleans. This guide gives you a structured, shop-tested maintenance routine built from manufacturer specifications and field-proven practices, so your helmet performs at full capacity every shift.
Table of Contents
- What you need: Tools, materials, and manufacturer requirements
- Step-by-step cleaning for lenses, ADFs, and electronics
- Inspection, cover lens changes, and filter plate care
- Interior padding and comfort maintenance routines
- Shop wisdom: Why replacement trumps over-cleaning
- Get the most out of your welding gear with expert-approved products
- Frequently asked questions
Key Takeaways
| Point | Details |
|---|---|
| Follow manufacturer advice | Always use approved methods and materials to prevent damage to your helmet’s critical components. |
| Clean and inspect routinely | Daily dust removal and weekly deep cleans safeguard vision and filter performance. |
| Replace, don’t over-clean | Swap out scratched or dirty filters and pads to avoid compromised protection and costly mistakes. |
| Maintain hygiene and comfort | Regular interior cleaning prevents odor, mildew, and discomfort during long shifts. |
What you need: Tools, materials, and manufacturer requirements
Once you understand why good maintenance matters, start by assembling the right tools and checking requirements for your specific helmet model. Grabbing whatever rag is nearby is how coatings get scratched and ADF sensors get destroyed. Before touching your helmet, pull the user manual and match your cleaning supplies to the manufacturer’s approved list.
Recommended tools and materials
- Microfiber cloths (two minimum: one for initial wipe, one for final buff)
- Lens-safe cleaning solution (no ammonia, no alcohol unless explicitly approved)
- Soft-bristle brushes for seams and headband slots
- Compressed air in short bursts for initial dust removal
- Replacement cover lenses and filter plates in the correct size for your model
- Mild soap and water for comfort pads only
- Isopropyl alcohol wipes only where the manufacturer specifically permits them
What to absolutely avoid
Never use acetone, paint thinner, or general-purpose degreasers on any part of a welding helmet. Abrasive cleaners, rough shop towels, and paper towels scratch optical coatings fast. Spraying any liquid directly onto ADF units or battery compartments risks electrical damage and coating degradation. As the Lincoln Electric Viking 3350 manual specifies, always follow manufacturer guidance on cleaning to avoid damaging ADF and optical coatings — this applies across virtually every premium helmet brand.
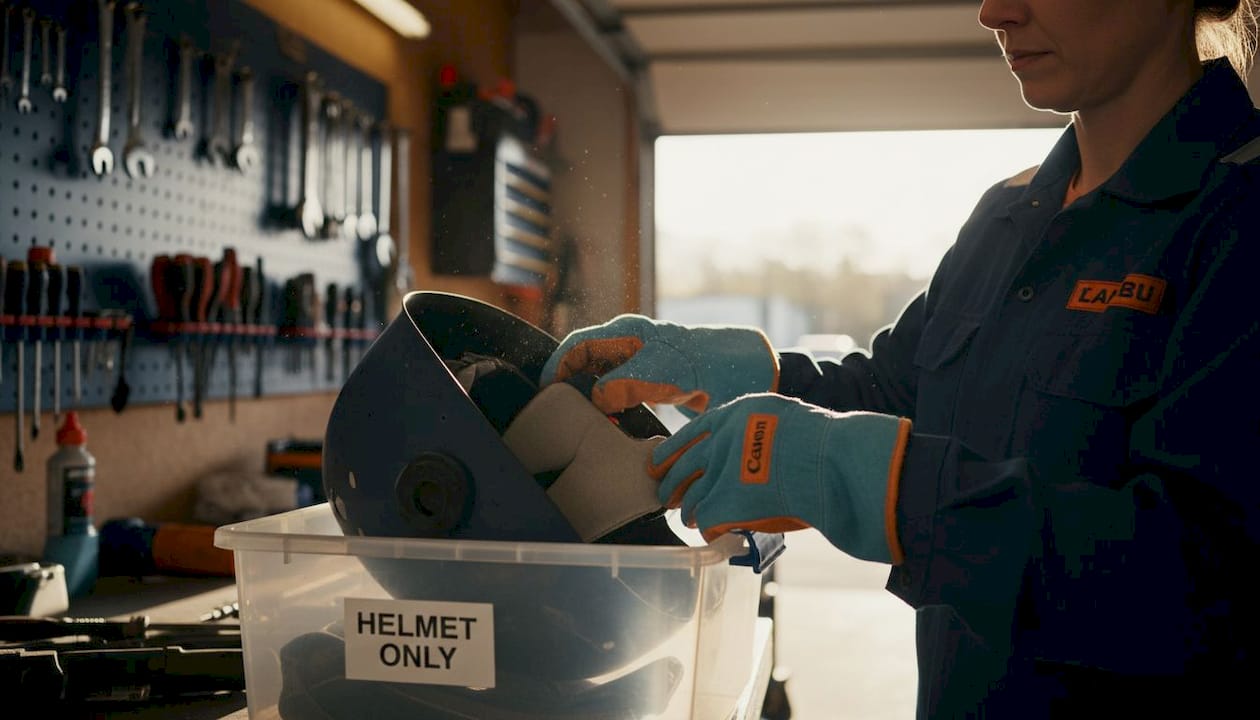
Pro Tip: Label a dedicated plastic bin “helmet only” and keep all your cleaning supplies in it. This prevents cross-contamination from shop chemicals and keeps the kit organized for whoever is on cleaning duty that shift.
Quick-reference comparison table: safe vs. unsafe materials
| Material | Safe for lens? | Safe for ADF? | Safe for pads? |
|---|---|---|---|
| Microfiber cloth (dry) | Yes | Yes | Yes |
| Lens-safe cleaning solution | Yes | Check manual | No |
| Compressed air (short bursts) | Yes | Yes | Yes |
| Paper towels | No | No | No |
| Acetone / solvents | No | No | No |
| Mild soap and water | No | No | Yes |
| Abrasive cloth / scotch-brite | No | No | No |
Before starting any cleaning session, check your specific model’s helmet inspection tips for guidance on approved materials. Different ADF technologies respond differently to cleaning agents, and what works on one model can void the warranty on another.
Step-by-step cleaning for lenses, ADFs, and electronics
With supplies ready, follow these routine cleaning steps to keep each helmet area in top condition. Rushing this process is where most damage occurs. Take your time, work in order, and treat each component as the precision instrument it is.
Cleaning sequence
- Remove the helmet from service and place it on a clean, stable work surface with good lighting.
- Apply compressed air in short, controlled bursts across the exterior lens surface to remove loose spatter and dust. Keep the nozzle at least four to six inches away to avoid driving debris into seams.
- Wipe the exterior cover lens with a dry microfiber cloth using light, straight strokes — never circular, which spreads scratches.
- Apply lens-safe cleaner to the cloth (not directly onto the lens), then gently pat and wipe the lens surface. Let it air dry for 30 seconds rather than rubbing immediately.
- Clean ADF sensors using a barely damp microfiber cloth. The sensors are typically located at the top corners of the ADF unit. Wipe once, check for residue, and allow to air dry fully before reassembly.
- Inspect internal lens surfaces under good light. If an internal cover lens needs attention, use the same pat-and-wipe method with a fresh microfiber cloth.
- Check headband and pivot points for grime or corrosion and clean with a dry brush.
- Reassemble only after all surfaces are completely dry.
Welderology’s cleaning guide confirms that using a structured cleaning frequency and technique directly prevents lens damage over time, especially for helmets in high-spatter environments. For caring for auto-darkening systems, strict adherence to the sequence above keeps sensor windows clear and switching times accurate.
Important: Never spray any liquid onto the ADF unit directly. Moisture intrusion into the electronics causes erratic darkening behavior and permanent sensor failure.
For battery-powered models specifically, the 3M Speedglas G5 user manual makes a critical operational point: treat battery-powered parts and sensors as entirely separate maintenance items. That means no moisture near power compartments, no compressed air blasted at battery doors, and always removing batteries before any wet cleaning step. Maintaining welding electronics requires this level of discipline to avoid costly replacements.
Component cleaning summary table
| Component | First step | Cleaning method | Drying method |
|---|---|---|---|
| Exterior cover lens | Compressed air | Lens-safe solution on cloth | Air dry |
| Interior cover lens | Remove from frame | Pat and wipe with microfiber | Air dry |
| ADF unit | Dry brush edges | Barely damp microfiber on sensors | Full air dry |
| ADF sensor windows | Check for spatter | Single gentle wipe | Air dry |
| Headband and pivots | Dry brush | Damp cloth if needed | Air dry |
| Battery compartment | Visual check only | No liquid contact | N/A |
Pro Tip: Clean your helmet at the end of every shift, not the beginning. End-of-shift cleaning prevents spatter and chemical residue from bonding overnight, which makes next-day cleaning far easier and reduces the risk of etched lenses.
Inspection, cover lens changes, and filter plate care
Once your helmet looks clean, it’s time to inspect and — if needed — replace components to guarantee full protection. Cleaning removes surface contamination, but it cannot undo physical damage. That distinction is critical for shop managers responsible for team safety.
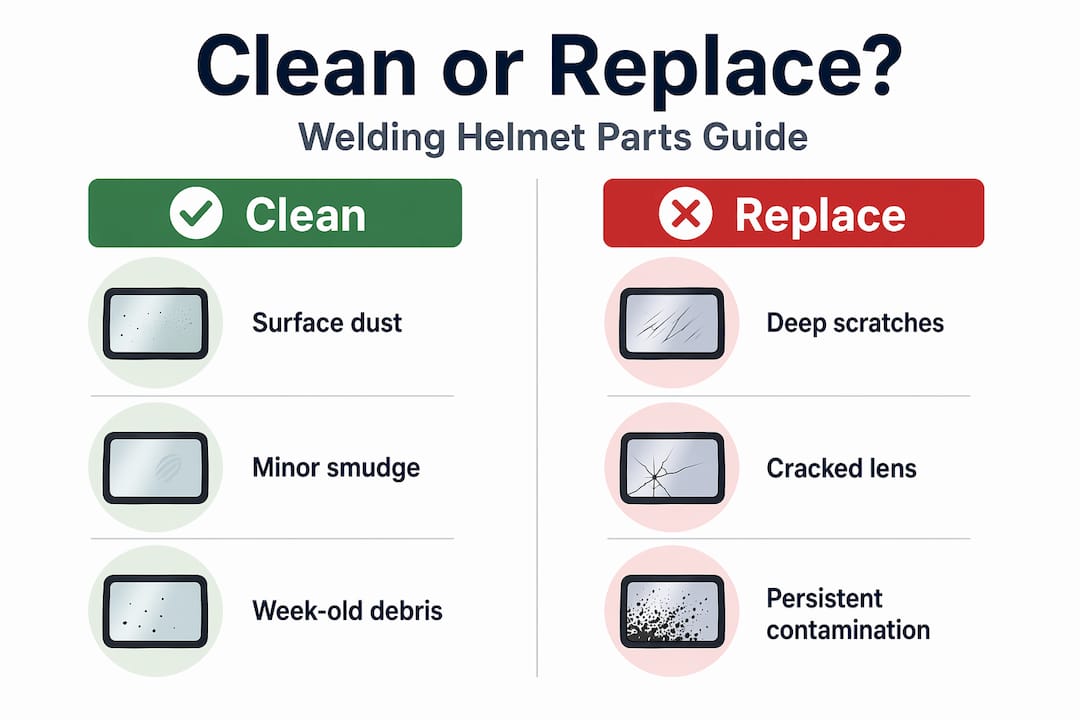
Signs it’s time to replace, not clean
- Pitting on the lens surface that catches light at an angle
- Deep scratches that remain visible after cleaning
- Cracks of any size, even hairline fractures at the edges
- Persistent discoloration from chemical or UV exposure
- Spatter buildup that cannot be removed without aggressive scrubbing
3M Speedglas lens guidance is explicit: inspect the filter and replace protective cover lenses when they become damaged or irreversibly dirty. A scratched cover lens doesn’t just look bad — it creates visual distortion that throws off arc judgment and increases eye fatigue during long weld passes.
How to swap a cover lens or filter plate
- Power down and remove batteries from the ADF if applicable.
- Lay the helmet face-up on a clean cloth to protect the exterior finish.
- Release the front cover frame using the manufacturer’s retention mechanism (tabs, clips, or screws depending on the model).
- Slide out the old cover lens without touching the ADF surface beneath it.
- Inspect the ADF while exposed — check for spatter on sensor windows before installing the new lens.
- Slide in the replacement lens, ensuring it seats flush with no gaps on any edge.
- Re-seat the front frame and confirm all retention points are locked.
- Repower and test ADF switching speed before returning the helmet to service.
For general helmet maintenance best practices, this replacement procedure should be part of a monthly inspection schedule, not just a reactive step taken after obvious damage. Lens inspection practices vary slightly by model, so always cross-reference with your helmet’s documentation.
Cleaning vs. replacement: decision guide
| Damage type | Clean first? | Replace? |
|---|---|---|
| Light surface dust | Yes | No |
| Minor smudge or fingerprint | Yes | No |
| Surface spatter (loose) | Yes | No |
| Deep scratch | No | Yes immediately |
| Pitting or crazing | No | Yes immediately |
| Crack of any size | No | Yes immediately |
| Chemical staining | Try once, then | Replace if persistent |
Pro Tip: Stock at least three replacement cover lenses per active helmet in your shop. A lens change mid-shift takes under two minutes with spares on hand. Hunting for replacements during production shuts down the job and turns a small supply cost into a significant labor loss.
Interior padding and comfort maintenance routines
Cleaning lens areas is only half the battle — interior hygiene makes a real difference for both welder comfort and long-term helmet durability. A helmet with mildewed padding gets avoided by the crew, worn incorrectly, or skipped altogether, which creates far more serious safety gaps than a dirty lens ever would.
Best practices for interior cleaning
- Removable pads: Check the label before washing. Most quality pads are machine washable on a gentle cold-water cycle. Always air dry only — machine drying warps foam and degrades elastic retention.
- Non-removable pads: Wipe with a cloth lightly dampened with a helmet-safe antibacterial cleaner. Avoid saturating the material, which pushes moisture into the shell structure.
- Vent areas: Use a soft brush or compressed air to clear metal dust and debris from any ventilation channels inside the shell.
- Headband contact surfaces: Wipe down after every shift in high-sweat environments. Sweat residue accelerates corrosion on metal adjustment components.
- Shell interior: A dry microfiber wipe removes settled dust without risking moisture intrusion near the ADF mounting hardware.
HJC’s helmet cleaning guidance recommends consistently cleaning and maintaining non-lens components — including vent areas and removable pads — for both hygiene and inspection readiness. The same logic applies directly to welding helmets: a clean interior is easier to inspect for cracks, loose mounts, and worn retention hardware.
Odor buildup and mildew are preventable problems. The main cause is putting a warm, sweaty helmet into a dark locker or toolbox immediately after a shift. Always leave helmets in a well-ventilated area after use, and rotate between two helmets when possible in busy shops. For non-removable pad situations, products specifically designed to kill bacteria and mold without saturating fabric work well — look for alcohol-free formulas that won’t off-gas onto the ADF coating.
Pro Tip: Set a recurring calendar reminder every two weeks for a full interior inspection and pad cleaning. Tie it to a shop-wide maintenance window so it gets done consistently, not just when someone notices an odor or a cracked headband slot.
Shop wisdom: Why replacement trumps over-cleaning
Here’s the take you won’t hear from every vendor: aggressive cleaning is often the problem, not the solution. We see it repeatedly in shops — a welder notices spatter on a cover lens and scrubs at it with whatever’s available. The spatter comes off. The coating does too. Now you’ve got a lens that passes a quick visual check but creates optical distortion every time the ADF fires.
The math on replacement versus over-cleaning is clear. A box of cover lenses costs a fraction of what a full ADF unit runs. 3M Speedglas guidance puts it plainly: if a cover lens or inner protection plate gets repeatedly spattered and becomes hard to clean, replacement is usually safer and more cost-effective than aggressive scrubbing that risks scratching coatings. That’s a manufacturer telling you to stop fighting the lens and just swap it.
Professional shop managers who run tight operations keep lens kits and pad sets in stock the same way they keep grinding discs or MIG wire on the shelf — because running out mid-production is unacceptable. The welding helmet selection decision should factor in consumable availability and replacement part cost from day one, not after the first lens gets destroyed.
The other piece most guides skip: frequent low-quality cleaning shortens the total usable life of the ADF itself. Every time you introduce an unapproved solvent or rough cloth near the filter, you risk degrading the liquid crystal cells that control darkening speed. A filter that dims a few milliseconds slower than spec might never get flagged in a quick visual inspection, but it’s already failing the welder when arc strike happens. Scheduled replacement of predictable consumables — cover lenses every few months in active shops, pads seasonally — protects the expensive components by keeping the cheap ones fresh.
Get the most out of your welding gear with expert-approved products
If your helmet is ready for an upgrade or you’re running low on critical replacement parts, the right source makes gear upkeep simple and reliable.
At Simpleweld, we stock industrial-grade welding helmets built to take daily shop abuse, along with the replacement lenses, pads, and accessories that keep your existing gear running at spec. Whether you’re outfitting a new hire or restocking your helmet maintenance kit, our catalog covers the helmets and welding safety gear your team depends on. Browse our full range of welding and fabrication tools, and make helmet upkeep a straightforward part of your shop’s standard operating procedure.
Frequently asked questions
How often should I clean my welding helmet lens?
Quick cleanings should happen daily or after each shift, with a thorough lens cleaning at least once a week or after any heavy-spatter session, as structured cleaning frequency directly prevents long-term lens damage.
What should I avoid when cleaning auto-darkening filters?
Never use solvents, abrasive materials, or spray liquids directly onto the ADF. Use a barely damp microfiber cloth and follow the manufacturer’s guidelines to avoid damaging optical coatings and sensor windows.
When is it time to replace a cover lens or filter plate?
Replace immediately if you see deep scratches, pitting, cracks, or persistent contamination that won’t clean off, as continued use of a damaged lens risks optical distortion and compromised protection.
How can I prevent interior odor or mildew in my helmet?
Regularly remove and wash pads if the design allows it, always air dry completely after use, and use a helmet-safe antibacterial cleaner for non-removable interiors. Routine pad maintenance keeps vent areas clean and interiors inspection-ready.
Do I need to use special products for cleaning my welding helmet?
Yes. Always use products explicitly approved by your helmet’s manufacturer and avoid all household cleaners. Following manufacturer-approved cleaning guidelines protects coatings, warranties, and the optical integrity of your ADF.