

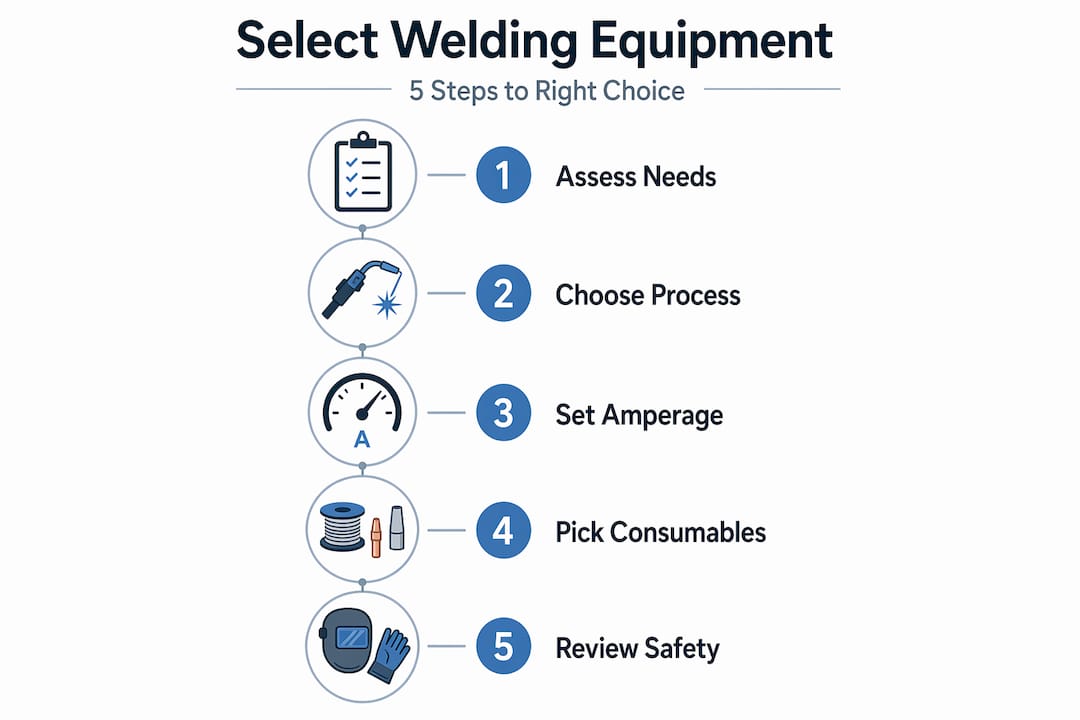
Knowing how to select welding equipment properly is the difference between a shop that runs at full efficiency and one that constantly fights rework, downtime, and weld failures. Too many professionals buy based on brand reputation or chase the highest amperage spec on the market, then discover the machine doesn’t fit their power supply, their metal thickness range, or their outdoor environment. This guide cuts through that. You’ll find a clear, process-driven framework for matching your machine, process, consumables, and environment to the actual work you do every day.
Table of Contents
- Understanding your welding needs and project requirements
- Selecting the right welding process and equipment type
- Calculating amperage, duty cycle, and power requirements
- Choosing the right consumables and welding electrodes
- Optimizing welding environment for safety and quality
- Our take: stop optimizing specs and start optimizing fit
- Get the right equipment for your application
- Frequently asked questions
Understanding your welding needs and project requirements
Before you touch a spec sheet, you need an honest inventory of your work. The right answer depends less on brand popularity or maximum amperage and more on how the welder will actually be used. That single principle eliminates more bad purchases than any feature comparison chart.
Start with your base materials. Are you working primarily with mild steel, stainless, aluminum, or a mix? Each material responds differently to heat input, shielding gas, and electrode chemistry. Then define your typical thickness range. A shop fabricating 1/4" steel gussets every day has completely different needs than one doing light gauge stainless enclosures.
Key factors to nail down before buying:
- Primary metals: Mild steel, stainless, aluminum, or specialty alloys
- Thickness range: Light gauge (under 1/8") vs. structural (1/4" and above)
- Work environment: Indoor booth, outdoor field repair, or confined space
- Production volume: High-cycle daily production vs. occasional repair work
- Precision requirements: Structural code welds vs. general fabrication
Location matters more than most buyers account for. Outdoor work rules out processes that rely on external shielding gas. Confined spaces require fume controls that a standard floor setup never needs. Investing in durable welding equipment matched to your environment pays back fast in reduced maintenance and consistent output.
Don’t overbuy on amperage without verifying your power availability. A 400-amp machine is useless in a shop with only 115V single-phase service. Work through the full picture first.
Selecting the right welding process and equipment type
Once you know your materials, thickness, and environment, the process choice becomes straightforward. Each major process has a specific profile of strengths that either fits your situation or doesn’t.
The four main processes compared:
- MIG (GMAW): MIG welders offer stable arcs, easier learning curves, and cleaner welds for indoor fabrication. Best for thin-to-medium steel and production environments where speed matters.
- Stick (SMAW): Performs reliably outdoors on dirty, rusty, or painted metal. The flux coating on the electrode generates its own shielding gas, making wind a non-issue. The most portable option for field work.
- TIG (GTAW): Delivers the cleanest, most precise welds available, especially on aluminum and thin stainless. Requires a skilled operator and a clean base metal surface. Slower, but unmatched for appearance and precision.
- Flux-cored (FCAW): A strong outdoor option when you need higher deposition rates than MIG but can’t guarantee shielding gas coverage. Produces more spatter and slag than MIG, so cleanup time increases.
Understanding the benefits of MIG welding for production shops helps clarify why it dominates indoor fabrication. But don’t default to it just because it’s familiar.
Pro Tip: If your shop runs multiple material types and thicknesses, a multi-process machine can cover MIG, TIG, and Stick in one unit. The tradeoff is typically a narrower sweet spot on each process compared to a dedicated machine. For high-volume single-process work, dedicated machines win every time.
Review your welding electrodes guide before finalizing any process decision, because consumable availability and cost are part of the total equipment equation.
Calculating amperage, duty cycle, and power requirements
Amperage and duty cycle are where most buyers make costly mistakes. Getting both right protects your equipment and your weld quality simultaneously.
The foundational rule: 1 amp per 0.001" of material thickness, and you should add a 20% buffer on top of that estimate to account for duty cycle demands. Welding 1/4" steel (0.250") requires roughly 250 amps as a baseline, so your working machine should be rated comfortably above that at its stated duty cycle.
Duty cycle is the percentage of a 10-minute period a machine can operate at a given amperage without overheating. A machine rated at 300A at 60% duty cycle can run 6 minutes out of every 10 at 300 amps. Push it harder or longer and the thermal protection kicks in, costing you production time.
| Metal thickness | Baseline amperage | With 20% buffer | Recommended voltage |
|---|---|---|---|
| 1/16" (0.0625") | 63A | 75A | 115V |
| 1/8" (0.125") | 125A | 150A | 230V |
| 3/16" (0.1875") | 188A | 225A | 230V |
| 1/4" (0.250") | 250A | 300A | 230V |
| 3/8" (0.375") | 375A | 450A | 230V/3-phase |
Power supply factors to check before buying:
- 115V single-phase handles light fabrication and maintenance only
- 230V single-phase covers most shop applications up to 3/8" steel
- Heavy structural work above 3/8" typically requires 230V or three-phase service
- Extension cord length and gauge affect available voltage at the machine
Pro Tip: Run your machine in the 70 to 80% range of its maximum output during normal production. Consistently running at 95 to 100% dramatically shortens component life, even on industrial-grade machines. Size up slightly rather than buying exactly to your minimum need.
Choosing the right consumables and welding electrodes
Your machine choice is only half the equation. Feeding it the wrong consumable will produce defective welds regardless of machine quality. The AWS electrode classification system tells you everything you need to know: the flux coating provides the shielding gas effect, and matching classification to base metal and job requirements is non-negotiable for weld quality.
The AWS classification breaks down clearly. For a Stick electrode like E7018: E means electrode, 70 means 70,000 PSI tensile strength, 1 means all-position capability, and 8 identifies the coating and current type. Knowing how to read that code gives you the ability to evaluate any electrode against your specific job requirements without relying on guesswork.
| Electrode | Tensile strength | Best use | Current type | Notes |
|---|---|---|---|---|
| E6010 | 60,000 PSI | Pipe, root passes | DC+ only | Penetrating arc, fast freeze |
| E6011 | 60,000 PSI | Dirty/rusty metal, AC available | AC or DC | More versatile than E6010 |
| E6013 | 60,000 PSI | Sheet metal, general fab | AC or DC | Soft arc, easy slag removal |
| E7018 | 70,000 PSI | Structural, code work | DC+ preferred | Low hydrogen, requires dry storage |
Low-hydrogen electrodes like E7018 are critical for structural and code work, but they are also sensitive to moisture. A single exposure to humid air can introduce hydrogen into the weld and cause cracking. Keep them in a rod oven at 250 to 300°F or in a sealed manufacturer container until use. Recondition any exposed electrodes before welding.
Pro Tip: Always follow manufacturer and applicable welding code recommendations for electrode storage and reconditioning. A $40 rod oven eliminates the risk of hydrogen-induced cracking on structural welds, which can cost thousands in rework or liability.
Your welding electrode selection guide should be part of every new project setup, not an afterthought.
Optimizing welding environment for safety and quality
Equipment selection doesn’t stop at the machine and consumables. The environment your welders work in directly affects weld quality, worker health, and long-term shop performance. Fume control is the most overlooked factor in how to choose welding equipment for professional applications.
Different processes generate very different fume volumes. Flux-cored welding produces the heaviest fume loads due to the burning flux. MIG on clean steel is significantly lighter. Stick welding falls in between, with fume characteristics that vary based on electrode coating. The best fume mitigation depends on weld process, workspace layout, and worker habits, and combining technologies is often necessary.
Fume extraction options by shop type:
- Extraction arms (central or mobile): Most flexible for multi-station shops, capture fumes at the source
- Downdraft tables: Ideal for smaller parts and bench-level work, pull fumes down and away from the welder’s breathing zone
- On-torch extraction: Integrated into the welding gun, captures fumes closest to the arc
- Ambient filtration: General shop air filtration, best used as a backup layer, not a primary solution
Weld angle, part geometry, and shop airflow all affect how well any system captures fumes. A welder positioned between the arc and the extraction inlet can actually push fumes toward their face. Worker training on positioning matters as much as the equipment itself.
“The best fume mitigation strategy is one your team actually uses consistently. Sporadic use of an expensive system is worse than consistent use of a simpler one, because it creates a false sense of protection.”
Pro Tip: Consistently used, well-placed extraction arms outperform a top-of-the-line ambient filtration system that runs while welders ignore it. Buy for your actual workflow habits, then build better habits around what you install.
Our take: stop optimizing specs and start optimizing fit
Most welding equipment buying mistakes don’t come from choosing the wrong brand. They come from buying specs instead of buying fit. We’ve seen shops drop serious money on a 400-amp multi-process machine that spends 90% of its life running at 150 amps on mild steel, because someone assumed “more capability” meant “better purchase.”
The uncomfortable truth about choosing welding tools is that the best welding gear for your shop is usually the one that does your specific job at the appropriate duty cycle, on your available power supply, with the consumables you can actually source locally or receive reliably. A machine that is 80% of the theoretical “best” but 100% right for your work will always outperform a technically superior machine that constantly fights your environment, your power, or your operators’ skills.
The same logic applies to consumables. Shops that standardize on two or three electrode types for their common metals and buy them in quantity almost always produce more consistent welds than shops with 12 electrode types and no clear selection protocol. Simplicity in your welding supplies checklist is a production advantage, not a compromise.
Buy for today’s actual work, with enough headroom to grow. Don’t buy for the jobs you might land someday. And whenever you’re evaluating why to choose professional welding equipment over consumer-grade alternatives, the answer is rarely about specs. It’s about duty cycle, consistency, and how the machine behaves at hour six of a production run, not hour one.
Get the right equipment for your application
If you’ve worked through this welding equipment guide and you’re ready to spec out your next machine, consumables, or safety gear, Simpleweld has the industrial-grade products to match what you actually need. Our catalog is built for professional welders and fabrication shops doing real work, not weekend projects.
From MIG wires and welding rods to welding helmets and safety gear, every product is sourced with industrial performance standards in mind. Whether you’re outfitting a new shop station or replacing equipment that’s hit the end of its service life, browse the full product range at Simpleweld.com and find the right fit for your process, your metal, and your environment.
Frequently asked questions
How do I determine the amperage needed for welding specific metal thickness?
Use 1 amp per 0.001" of material thickness as your baseline, then add approximately 20% to ensure your machine handles duty cycle demands without overheating during production runs.
What welding process is best for outdoor repairs with rusty metal?
Stick welding (SMAW) is the right call for outdoor work on contaminated metal because the flux coating creates its own shielding gas, making it tolerant to wind, rust, and surface contaminants that would cause MIG failures.
Why is electrode classification important when selecting welding consumables?
The AWS electrode classification encodes tensile strength, weld position capability, and current type directly into the label, giving you the core matching criteria without needing a separate data sheet for every electrode.
How can I improve weld fume safety in my fabrication shop?
Match your extraction technology to your specific welding processes and workstation layout, then invest in consistent worker training so the equipment gets used on every weld, not just when supervisors are watching.