

Bad welds don’t just look sloppy. They fail inspections, trigger costly rework, and in structural applications they can create genuine safety hazards that expose you to liability. Every contractor welding how to guide on the internet tells you to “clean your metal” and “use the right rod,” then stops there. This guide goes further. We cover preparation, licensing basics, joint fit-up, heat management, thick metal techniques, AWS D1.1 compliance, and the safety protocols that keep your crew working and your projects on schedule.
Table of Contents
- Preparing for contractor welding: tools, materials, and safety essentials
- Step-by-step welding process for contractors: best practices from joint prep to cool down
- Welding thick metal safely and effectively: techniques and code compliance
- Ensuring safety and regulatory compliance for contractor welding projects
- Why mastering contractor welding is about more than technique alone
- Equip yourself for contractor welding success with Simpleweld
- Frequently asked questions
Key Takeaways
| Point | Details |
|---|---|
| Proper preparation | Thorough joint cleaning, precise beveling, and correct root gaps are essential for strong and defect-free welds. |
| Compliance and licensing | Contractors must meet licensing requirements and follow welding codes like AWS D1.1 for legal and quality assurance. |
| Safety protocols | Implement hot work permits, fire watch, and fume control measures to ensure safe welding environments and regulatory compliance. |
| Technique matters | Multi-pass welding with appropriate filler rods and controlled heat input prevents cracking and ensures durability. |
| Holistic approach | Mastery comes from blending technique with safety culture, adherence to codes, and practical onsite problem solving. |
Preparing for contractor welding: tools, materials, and safety essentials
The difference between a smooth project and a costly do-over usually starts before the arc is ever struck. Getting your tools, materials, and compliance in order before you pick up a stinger is not bureaucratic overhead. It is how experienced contractors stay profitable.
Essential tools and consumables
Every contractor’s job box should cover the basics across the three dominant processes: stick (SMAW), MIG (GMAW), and TIG (GTAW). Here is what you need on hand:
- Welding machine: A multiprocess unit handles stick, MIG, and TIG from one power source, which reduces the gear you haul to site
- Angle grinder: For surface prep, weld cleanup, and beveling edges before fit-up
- Wire brush and chipping hammer: Slag removal between passes on stick welds
- Clamps and magnets: For holding fit-up while you tack
- Filler metals: E6010 and E6011 rods for open-root passes; E7018 for fill and cap passes on structural work; ER70S-6 MIG wire for general fabrication
| Welding rod | Current type | Best use case | Tensile strength |
|---|---|---|---|
| E6010 | DC+ | Root passes, dirty metal | 62,000 psi |
| E6011 | AC/DC | All-position, field work | 62,000 psi |
| E7018 | DC+ | Structural, low-hydrogen | 70,000 psi |
| ER70S-6 | DC+ (MIG) | Sheet metal, fabrication | 70,000 psi |
Safety gear you cannot skip
Welding safety gear is not optional, and wearing the wrong gear is nearly as bad as wearing none. At minimum, every contractor welder needs:
- Auto-darkening helmet with a shade range of 9 to 13 depending on amperage
- Leather gloves rated for the process (TIG gloves are thinner for dexterity; MIG and stick require heavier protection)
- Fire-resistant jacket or sleeves to protect against spatter and UV radiation
- Steel-toed boots with no exposed laces near molten metal
- Respirator or powered air-purifying respirator (PAPR) when working in confined spaces or with coated metals
Pro Tip: Never weld galvanized steel without respiratory protection. Zinc fumes cause metal fume fever, and the symptoms mimic the flu so closely that welders often don’t connect the cause until it’s too late.
Licensing and legal requirements
Before taking on any structural or commercial welding contract, confirm your licensing status. Requirements vary by state, but California’s standards are among the most detailed. California welding contractors must have 4 years of journey-level experience, pay a $450 CSLB application fee, and pass both the Law & Business exam and the C-60 Trade exam. Other states have their own thresholds, so check with your local contractor licensing board before bidding structural work.
Also review welding standards compliance requirements for your project type. AWS, ASME, and local building codes often overlap on commercial jobs, and missing a code requirement mid-project is a far more expensive lesson than learning it upfront.
Step-by-step welding process for contractors: best practices from joint prep to cool down
With tools staged and safety covered, let’s walk through the execution sequence that separates clean, code-quality welds from field repairs waiting to happen.
Surface preparation
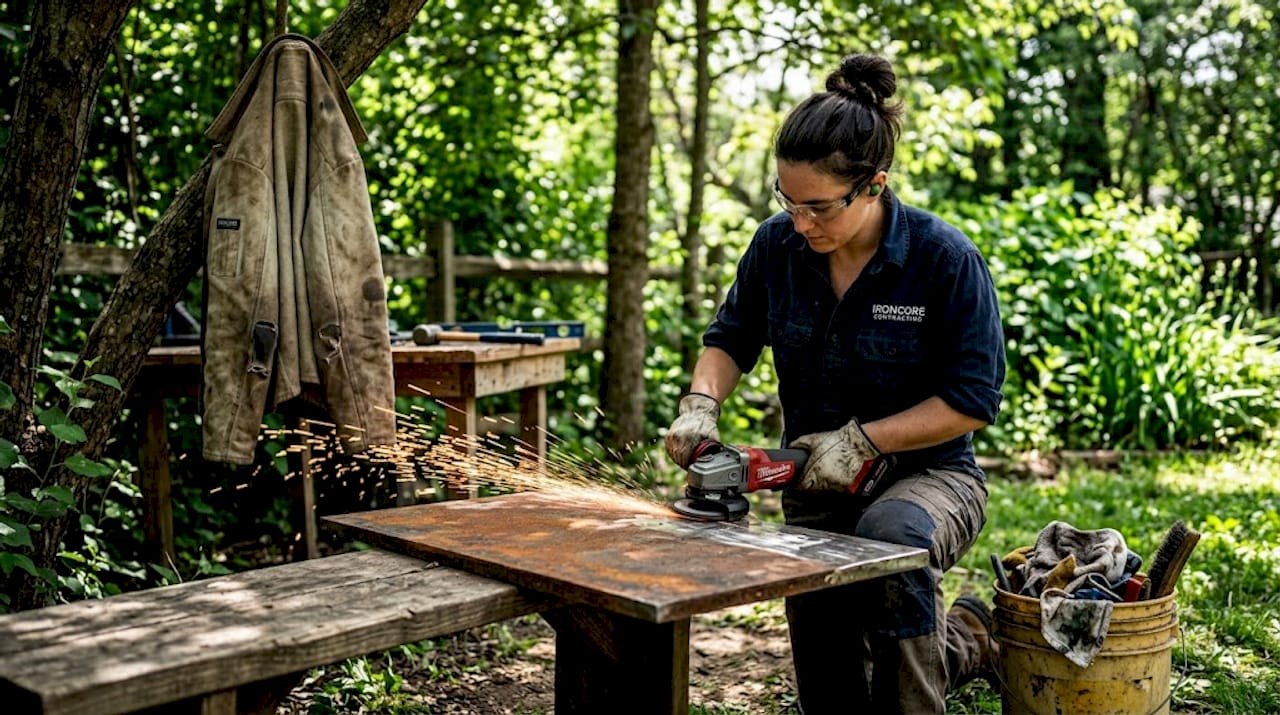
Contamination is the number one cause of porosity and incomplete fusion in contractor welds. Clean metal to bare shiny with 80-grit sandpaper followed by an acetone wipe before welding. On thicker structural plate, use a flap disc on an angle grinder to remove mill scale, rust, and paint within at least one inch of the weld zone on both sides.
Joint fit-up and weld joint preparation
Fit-up determines whether your weld will fuse completely or leave unfused root faces that fail under load. The key variables are:
- Root gap: The space between the two pieces at the weld root; typically 1/16 to 1/8 inch for most structural groove welds
- Bevel angle: A 22.5 to 37.5 degree bevel on each piece creates a 45 to 75 degree included groove angle, which is the standard range for single-V groove joints
- Root face (land): A 1/16 to 1/8 inch flat left at the bottom of the bevel to prevent burn-through on the root pass
Welding execution: step by step
- Tack weld at intervals to hold fit-up before running full passes. On sheet metal, tack every 1 to 2 inches to prevent distortion from heat buildup.
- Run the root pass with a controlled travel speed. On stick, keep your arc length equal to the rod diameter. On MIG, run a slight drag angle of 5 to 10 degrees.
- Clean between passes. Chip slag, wire brush, and visually inspect each pass for cracks or porosity before adding the next layer.
- Use stitch welds on thin material. Weld 1-inch segments spaced 2 to 3 inches apart rather than running continuous beads, then go back and fill the gaps after the metal cools. This directly prevents warping.
- Allow adequate cool-down between passes. On multi-pass welds, keep interpass temperature below 450°F unless your WPS specifies otherwise.
- Inspect the final cap pass visually for undercut, overlap, and proper crown height before calling the weld complete.
Pro Tip: On MIG work, your travel speed controls your bead width more than your wire feed speed does. If your bead is too wide and flat, speed up your travel before reaching for the wire feed knob.
| Common welding mistake | Root cause | Fix |
|---|---|---|
| Porosity | Contaminated base metal or shielding gas loss | Clean thoroughly, check gas flow rate |
| Undercut | Too high amperage or too fast travel | Reduce amps, slow down at edges |
| Incomplete fusion | Cold starts or poor fit-up | Preheat if needed, correct root gap |
| Warping | Excess continuous heat | Use stitch welding and backstep technique |
Refer to MIG welding steps for a deeper breakdown of wire feed settings and voltage curves for different material thicknesses.
Welding thick metal safely and effectively: techniques and code compliance
Thin material forgives technique errors. Thick plate does not. When you’re working on steel over 1/2 inch, the rules change significantly, and so does your exposure to weld defects that won’t show up until a load test or inspection reveals them.
Preheat and interpass temperatures
Preheat is not optional on high-strength low-alloy (HSLA) steels. For thick plate welding over 1/2 inch, use root gaps of 1/16 to 1/8 inch, run E7018 rods at 180 to 220 amps, and preheat HSLA steels to 200 to 300°F before striking the arc. Skipping preheat on restrained joints leads to hydrogen-induced cracking, which can appear hours or even days after the weld cools.
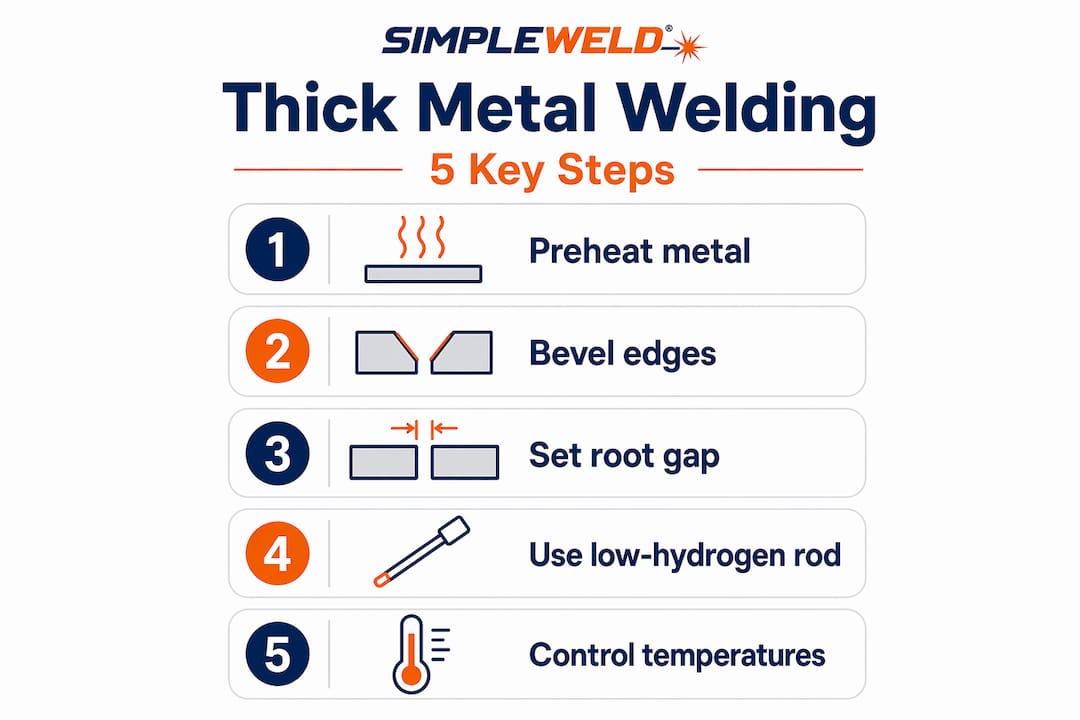
Multi-pass technique
No single pass should try to fill a deep groove. Each pass should be roughly 1/4 inch or less in width and depth. The sequence matters:
- Root pass: Slowest, most controlled pass. Sets the foundation. Any defects here compound through every subsequent layer.
- Fill passes: Maintain consistent interpass temperature. Check each pass for slag inclusions before adding the next.
- Cap pass: Controls final profile. Maintain a slight crown (no more than 1/8 inch above the base metal surface) to meet AWS visual acceptance criteria.
Filler selection and code compliance
E7018 is the go-to low-hydrogen rod for structural thick metal work. Its low-hydrogen coating (H8 designator or lower) prevents moisture absorption that causes porosity and cracking in restrained joints.
On structural projects, you must also work within AWS D1.1 prequalified WPS parameters. Under Clause 5 of AWS D1.1:2020, prequalified Welding Procedure Specifications are permitted when limits on materials, joints, processes, preheat, and interpass temperatures are met. Step outside those limits and you need a qualified WPS with documented procedure qualification records (PQR).
| Steel thickness | Preheat required | Recommended rod | Passes needed |
|---|---|---|---|
| Under 1/4 inch | None typically | E6011 or ER70S-6 | 1 to 2 |
| 1/4 to 1/2 inch | Optional (50°F min ambient) | E7018 | 2 to 3 |
| Over 1/2 inch | 200 to 300°F (HSLA) | E7018 (H8 or lower) | 3 or more |
Pro Tip: Store E7018 rods in a rod oven at 250 to 300°F once the package is opened. Even a few hours of ambient exposure can introduce enough moisture to cause hydrogen cracking in restrained joints. This is one of the most overlooked welding quality techniques on active job sites.
Ensuring safety and regulatory compliance for contractor welding projects
Technique and code compliance matter. But regulatory safety requirements protect your crew, your license, and your business. Missing a hot work permit or skipping a fire watch is the kind of oversight that ends contracts and generates OSHA citations.
Hot work permits
A hot work permit is a written authorization issued before welding, cutting, or grinding in any area where sparks or heat could contact flammable or combustible materials. NFPA 51B and OSHA 29 CFR 1910.252 require hot work permits for welding near flammables, with fire watch mandatory when combustibles exist within 35 feet and continuing for at least 30 minutes after welding stops.
The hot work permit process runs in four steps:
- Pre-work inspection: Identify all flammables within 35 feet. Remove them or cover them with fire-resistant blankets.
- Authorization: Supervisor or safety officer signs the permit. Define the scope, location, and duration of the work.
- Active monitoring: A designated fire watch stands by with a fire extinguisher during all welding operations.
- Closeout: After work ends and the 30-minute fire watch period is complete, the permit is closed out and filed.
Fume control and PPE
Engineering controls come first. OSHA’s hierarchy puts local exhaust ventilation (LEV) at the top, followed by general ventilation, and only then personal protective equipment. Respirators are the last line of defense, not the first.
OSHA prioritizes local exhaust ventilation for fume control, and welding safety standards require that respirators only substitute for ventilation when ventilation is genuinely insufficient. When respirators are necessary, they must be fit-tested per OSHA standard 1910.134. A respirator that has not been fit-tested provides unpredictable protection.
For daily PPE in contractor environments, layer your protection:
- Auto-darkening helmet with appropriate shade
- P100 or N95 half-mask respirator for general fume exposure
- PAPR for stainless, chrome-bearing alloys, or coated metals
- Leather or FR cotton jacket to cover all exposed skin
- Fire-resistant ear protection when grinding or working overhead
Pro Tip: Position your head out of the fume plume by adjusting your work angle. The fume rises directly off the arc. A simple shift in body position reduces your fume intake far more than most contractors realize, even before any ventilation equipment is involved.
Why mastering contractor welding is about more than technique alone
Here is the honest truth most welding guides won’t say out loud: a contractor who welds beautifully but ignores his WPS documentation, skips the preheat because the rod oven is back at the shop, and lets the fire watch wander off after ten minutes is a contractor who is one inspection or incident away from a serious problem.
Technique is the foundation. But what separates contractors who build long-term reputations from those who stay stuck bidding the lowest jobs is the integration of three things: standards knowledge, safety culture, and pragmatic problem-solving on site. Knowing welding quality insights from AWS D1.1 cold is valuable. Knowing how to apply those requirements when you show up to a site where the material certs are missing and the fit-up is off by 3/16 inch is what actually earns client trust.
Regulations change. AWS D1.1 revisions come out regularly. OSHA enforcement priorities shift. The beginner welding contractor who invests in staying current on codes and permit processes builds a business that compounds in value. The one who relies on how things were done five years ago eventually gets caught flat-footed on a commercial project where the inspector actually knows the current edition of the standard.
Safety culture is not a checklist. It is the daily decision to run the fire watch the full 30 minutes even when nothing looks like it could catch fire, to store your low-hydrogen rods correctly even when it’s inconvenient, and to call out a fit-up problem before you weld it shut rather than hoping the inspector misses it. Those habits protect your people, your license, and your margins.
Equip yourself for contractor welding success with Simpleweld
You now have the full picture of what contractor welding requires: preparation, technique, code compliance, and safety execution at every step. The next move is making sure your equipment can keep up with those demands.
At Simpleweld, we stock professional welders for contractors built for the demands of field and shop work, along with a full selection of welding rods and filler metals including E7018, E6010, E6011, and ER70S-6 wire. Need to stay compliant with PPE requirements? Our contractor safety gear covers helmets, respirators, gloves, and FR jackets from trusted industrial brands. We ship fast, stock deep, and carry the industrial-grade products that professional contractors actually rely on.
Frequently asked questions
What licensing do I need to become a welding contractor in California?
California welding contractors must have 4 years of journey-level experience, pay a $450 CSLB application fee, and pass both the Law & Business exam and the C-60 Trade exam before operating legally.
When is a hot work permit required for welding?
A hot work permit is required whenever welding or cutting takes place near flammable materials or in non-designated areas. NFPA 51B and OSHA 29 CFR 1910.252 mandate fire watch for at least 30 minutes after welding ends if combustibles are within 35 feet.
How should I prepare thick metal joints for welding?
Grind metal to bare shiny, bevel edges for proper groove geometry with root gaps of 1/16 to 1/8 inch, and preheat HSLA steels to 200 to 300°F before running your root pass to prevent hydrogen-induced cracking.
What are effective ways to control welding fume exposure?
Install local exhaust ventilation at the source first. OSHA requires fit-tested respirators per standard 1910.134 only when ventilation controls cannot reduce fume exposure to acceptable levels on their own.